Hands-on install of FV-10VE1 provides instant solution to high CO2 and particulate levels.
I'VE WRITTEN RECENTLY about the importance of combining filtration and air diffusion when trying to limit the indoor spread of viral particles. But indoor air pollution comes in many forms: smoke, dander, cooking fumes, bathroom odors. Chances are that if you an excess of any type of pollutant, your home is not adequately ventilated. It’s that simple.
Panasonic recently began making an energy recovery ventilator that’s well suited to retrofit: the FV-10VE1. While working on a small home in Florida, I had run into some indoor air challenges. The air was stale, full of particulate matter, and prone to trapping unhealthy levels of CO2 in bedrooms at night. I learned this with the help of some app-enabled air sensors.
Previous attempts to clear the air in the building included installing a high-efficiency 4-inch-thick filter media in the 30-year-old air handler, and having all of the ductwork cleaned. This effort had cut the particulate matter in half, but did not affect the levels of CO2 in bedrooms, which continued to spike at about 1500 ppm during sleeping hours, well above safe levels (less than 1,000 ppm). Here's an overview of my installation of the ERV, and the resulting impact on air quality in the home.
Phase 1: Collecting Parts & Pieces
The ERV unit arrived bare bones in the box. Due to the COVID-19 lockdown, I had extra challenges in acquiring all of the duct and other parts necessary for a complete installation. My costs (retail) related to the install amounted to about $300, which would include two return vents, two supply vents (one in each bedroom) and all of the associated insulated duct, clamps, foil tape and so on. I stuck with 4-inch round duct and parts for the entire installation, rather than switching to rectangular vent registers.
For quick reference, I used about 150 ft. of 4-inch insulated duct (R6), 14 stainless steel clamps, a roll of self-adhesive foil tape, a can of spray foam, a Panasonic WhisperComfort Wall Cap (FV-WC04VE1) and two 4-inch polyethylene y-connectors (designed for dust collection).
Phase 2: Hanging the Box
The FV-10VE1 weighs about 50 lbs., and at about 36 inches long, requires about a 6-ft wide space for installation, particularly once you add the insulated ducts. It can be wall mounted, but unless you have a large garage or mechanical room, you may find the second method installation more practical, as I did--hanging it from the ceiling. I suspended the unit with chains (as proscribed) from ceiling joists in the laundry room. This allowed the hinged door on the unit to swing down and open, and seemed good use of utility space. Make sure the hinge is on the side of the unit closest to the wall, and a second pair of hands makes hanging the unit much easier.
Phase 3: Ceiling (and gable) Surgery
I wanted to minimize cleanup as much as possible. The installation required a total of nine holes: four in the ceilings inside the house, four 6-inch holes in the ceiling next to the ERV, and one 4 1/2 inch hole in the gable end of the attic for the FV-WC04VE1 wall cap.
I cut the interior openings with a 4-inch hole saw attached to cordless drill. To control dust, I had to make a crude dust catcher from the bottom half of a gallon milk jug. Ordering a dust catcher online was delayed for weeks due to COVID-19. I switched to a cordless jigsaw for the other holes next to the ERV for the insulated duct to pass through and the hole in the gable end of the building
Phase 4: Y Assemblies and Duct Install
Use of insulated ducts was essential. Unconditioned attic space in Florida can easily exceed 100-degrees, even with power venting. I had great difficulty finding an insulated Y-connector however, in part because I couldn’t safely just walk in to an HVAC supplier during the pandemic, so I improvised my own (shown).
Rather than use a metal Y, which has very high thermal conductivity, I found a plastic version of a 4-inch Y used in dust collection. Plastic's thermal conductivity is a fraction of metal's. I covered the the three ends of the Y with coffee cans, and used spray foam to create a “cocoon” around the plastic body. This brought the two Y sections up to at least R6, compatible with the insulated ducting. I then clamped and taped the duct sections to each Y, and mummified the whole thing in HVAC foil tape.
After a rather unpleasant crawl through the attic (on a cloudy day), I pushed all of the ducts to their respective openings. I then simply inserted the 4-inch, adjustable flow round vent registers with a friction fit inside the ceiling penetrations and cleaned up the mess. This duct prep and install process took up most of the install, at about three half hours. I’m sure an HVAC trades person could do it much more quickly.
Startup: The Wall Switch Mystery
Next, I glanced over the installation manual for the ERV, plugged in the unit, and hit the rocker switch, but nothing happened. I went back to the manual and read it more carefully. The only instruction I had ignored was a note about adding a wall switch to the unit, because I didn’t need one, given that the control panel could be reached easily from floor level.
It turns out, however, that the FV-10VE WILL NOT RUN unless a wall switch circuit is installed and turned on. For a quick solution, I popped the wiring panel off the back of the unit, cut a small relay splice from some 12-gauge wire, and tied together the power receptacles for the switch (shown). The fix worked, and the unit started immediately when I hit the main rocker switch again. I’m sure I’ll hear from Panasonic if there’s some reason (code requirements or otherwise) that this solution should not be used.
Instant Results
Prior to starting up the ERV, I took some readings with an Awair indoor air monitor in one bedroom. Overall, air quality was very bad, a combination of excessive dust particulates, high humidity, and frequent spikes in CO2. After running the FV-10VE1 for about three hours, I took another reading. I also looked at the historic trends from the Awair record. After installing the ERV, I found the most dramatic improvement in the room's CO2 level. Checking it again the next day, the added ventilation had reduced nighttime CO2 levels to 50% of the previous average, as shown in the Before-After image. The particulate level, however seemed suspiciously unchanged however, so I brought in a second opinion—a Foobot air sensor.
The Foobot's results showed a marked improvement across the board in all types of pollutants in the same bedroom. I suspected that the stubborn dust readings on the Awair sensor might be inaccurate. After some research, I learned that the Awair sensors sometimes give false particulate readings as they become clogged. When I cleaned the Awair with pressurized air, its much improved results matched those of the Foobot fairly well.
Three Problems Solved
The ERV also solved other IAQ issues in this older home. The first was the lack of a ventilating bath fan—a problem typical of many older homes built in the 1970s and earlier. The second was the inadequate CFM of the kitchen range. With return ducts in both the bath and the cooking area of the kitchen, the FV-10VE1 clears humidity and overflow cooking particles automatically. In the bedrooms, the air is beyond better—it’s astronomically improved, never exceeding safe levels of CO2, chemicals, dust or VOCs.
As you can see from the Foobot screen shown, the Panasonic unit brought all levels of unhealthy pollutants down into safe and comfortable levels.
I haven’t spent a lot of time on the ERV unit’s specs, but you can read them here if you want the details. I feel comfortable recommending this unit as a quiet, energy efficient way to solve numerous indoor air problems simultaneously.
Veteran journalist Matt Power has reported on innovation and sustainability in housing for nearly three decades. An award-winning writer, editor, and filmmaker, he has a long history of asking hard questions and adding depth and context as he unfolds complex issues.


Review: Solving Multiple Indoor Air Problems with a Panasonic ERV
Hands-on install of FV-10VE1 provides instant solution to high CO2 and particulate levels.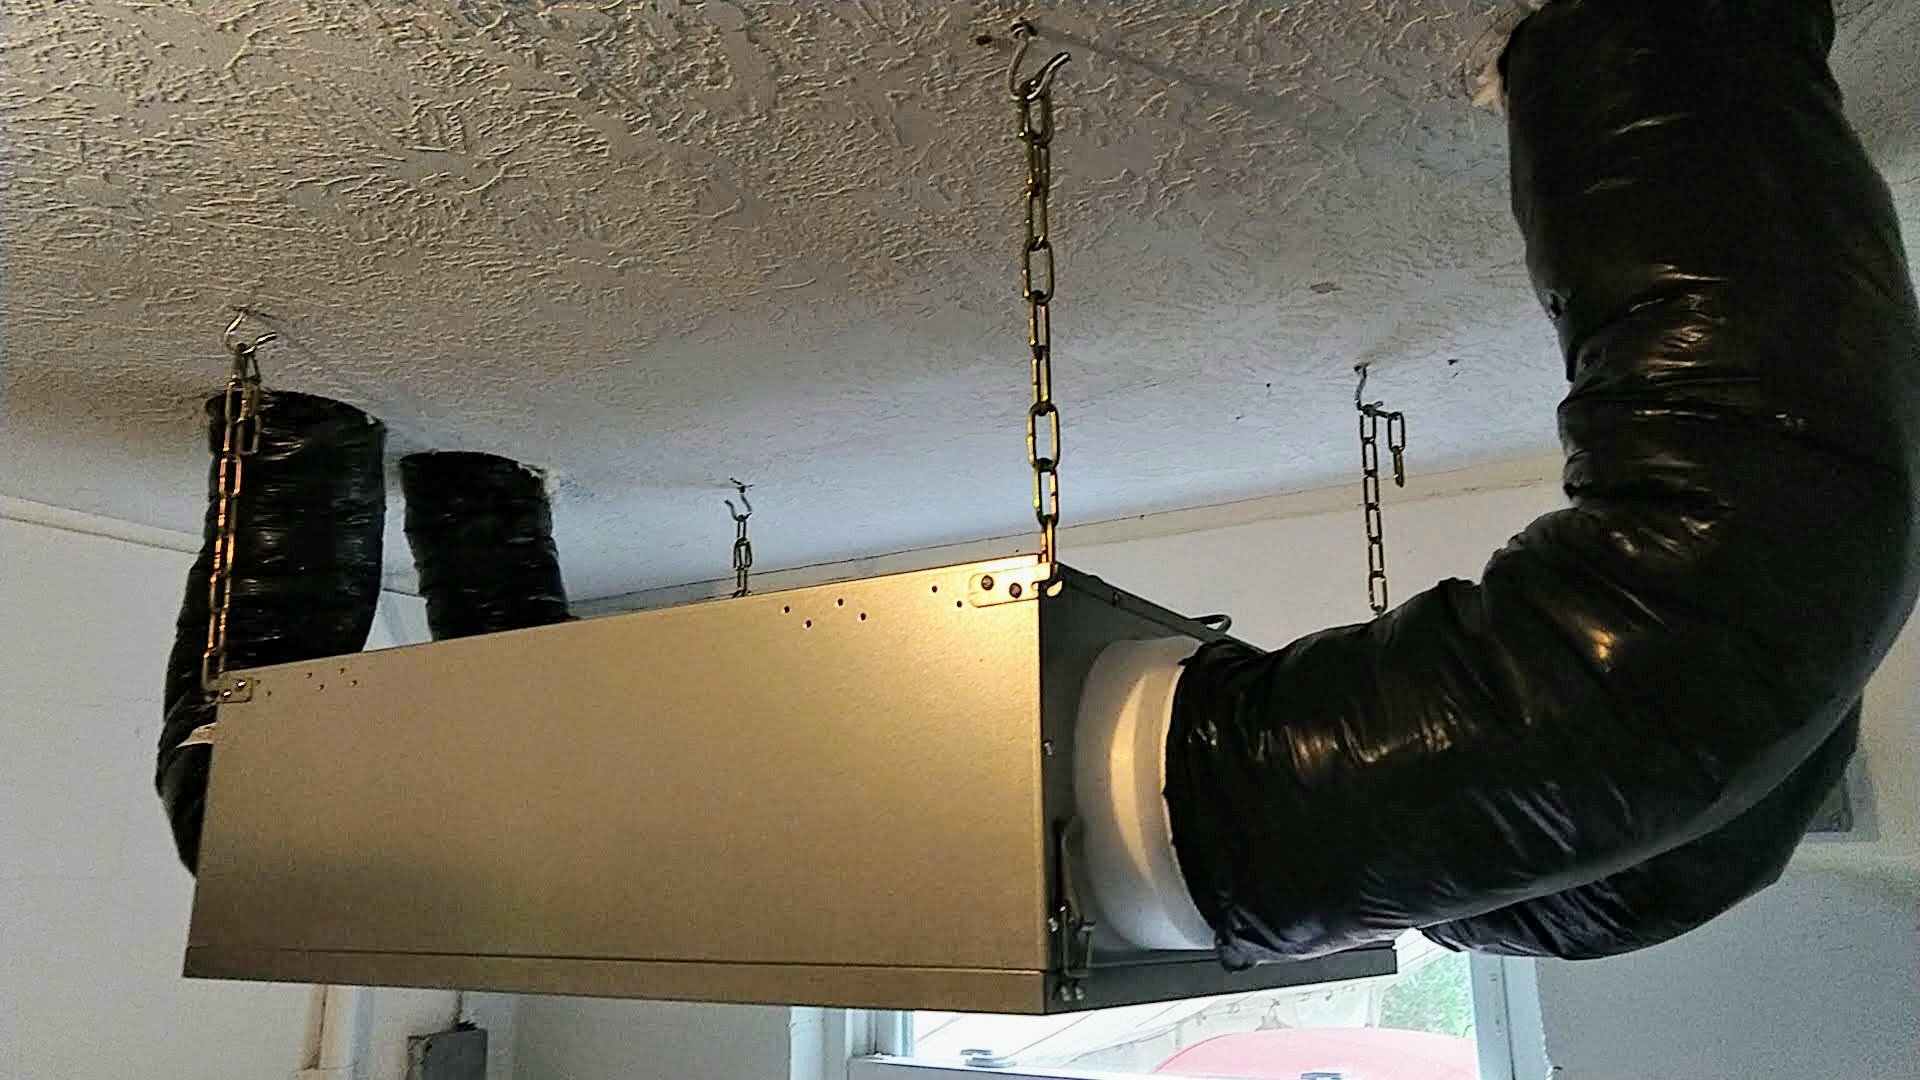
I'VE WRITTEN RECENTLY about the importance of combining filtration and air diffusion when trying to limit the indoor spread of viral particles. But indoor air pollution comes in many forms: smoke, dander, cooking fumes, bathroom odors. Chances are that if you an excess of any type of pollutant, your home is not adequately ventilated. It’s that simple.
Panasonic recently began making an energy recovery ventilator that’s well suited to retrofit: the FV-10VE1. While working on a small home in Florida, I had run into some indoor air challenges. The air was stale, full of particulate matter, and prone to trapping unhealthy levels of CO2 in bedrooms at night. I learned this with the help of some app-enabled air sensors.
Previous attempts to clear the air in the building included installing a high-efficiency 4-inch-thick filter media in the 30-year-old air handler, and having all of the ductwork cleaned. This effort had cut the particulate matter in half, but did not affect the levels of CO2 in bedrooms, which continued to spike at about 1500 ppm during sleeping hours, well above safe levels (less than 1,000 ppm). Here's an overview of my installation of the ERV, and the resulting impact on air quality in the home.
Phase 1: Collecting Parts & Pieces
The ERV unit arrived bare bones in the box. Due to the COVID-19 lockdown, I had extra challenges in acquiring all of the duct and other parts necessary for a complete installation. My costs (retail) related to the install amounted to about $300, which would include two return vents, two supply vents (one in each bedroom) and all of the associated insulated duct, clamps, foil tape and so on. I stuck with 4-inch round duct and parts for the entire installation, rather than switching to rectangular vent registers.
For quick reference, I used about 150 ft. of 4-inch insulated duct (R6), 14 stainless steel clamps, a roll of self-adhesive foil tape, a can of spray foam, a Panasonic WhisperComfort Wall Cap (FV-WC04VE1) and two 4-inch polyethylene y-connectors (designed for dust collection).
Phase 2: Hanging the Box
The FV-10VE1 weighs about 50 lbs., and at about 36 inches long, requires about a 6-ft wide space for installation, particularly once you add the insulated ducts. It can be wall mounted, but unless you have a large garage or mechanical room, you may find the second method installation more practical, as I did--hanging it from the ceiling. I suspended the unit with chains (as proscribed) from ceiling joists in the laundry room. This allowed the hinged door on the unit to swing down and open, and seemed good use of utility space. Make sure the hinge is on the side of the unit closest to the wall, and a second pair of hands makes hanging the unit much easier.
Phase 3: Ceiling (and gable) Surgery
I wanted to minimize cleanup as much as possible. The installation required a total of nine holes: four in the ceilings inside the house, four 6-inch holes in the ceiling next to the ERV, and one 4 1/2 inch hole in the gable end of the attic for the FV-WC04VE1 wall cap.
I cut the interior openings with a 4-inch hole saw attached to cordless drill. To control dust, I had to make a crude dust catcher from the bottom half of a gallon milk jug. Ordering a dust catcher online was delayed for weeks due to COVID-19. I switched to a cordless jigsaw for the other holes next to the ERV for the insulated duct to pass through and the hole in the gable end of the building
Phase 4: Y Assemblies and Duct Install
Use of insulated ducts was essential. Unconditioned attic space in Florida can easily exceed 100-degrees, even with power venting. I had great difficulty finding an insulated Y-connector however, in part because I couldn’t safely just walk in to an HVAC supplier during the pandemic, so I improvised my own (shown).
After a rather unpleasant crawl through the attic (on a cloudy day), I pushed all of the ducts to their respective openings. I then simply inserted the 4-inch, adjustable flow round vent registers with a friction fit inside the ceiling penetrations and cleaned up the mess. This duct prep and install process took up most of the install, at about three half hours. I’m sure an HVAC trades person could do it much more quickly.
Startup: The Wall Switch Mystery
Next, I glanced over the installation manual for the ERV, plugged in the unit, and hit the rocker switch, but nothing happened. I went back to the manual and read it more carefully. The only instruction I had ignored was a note about adding a wall switch to the unit, because I didn’t need one, given that the control panel could be reached easily from floor level.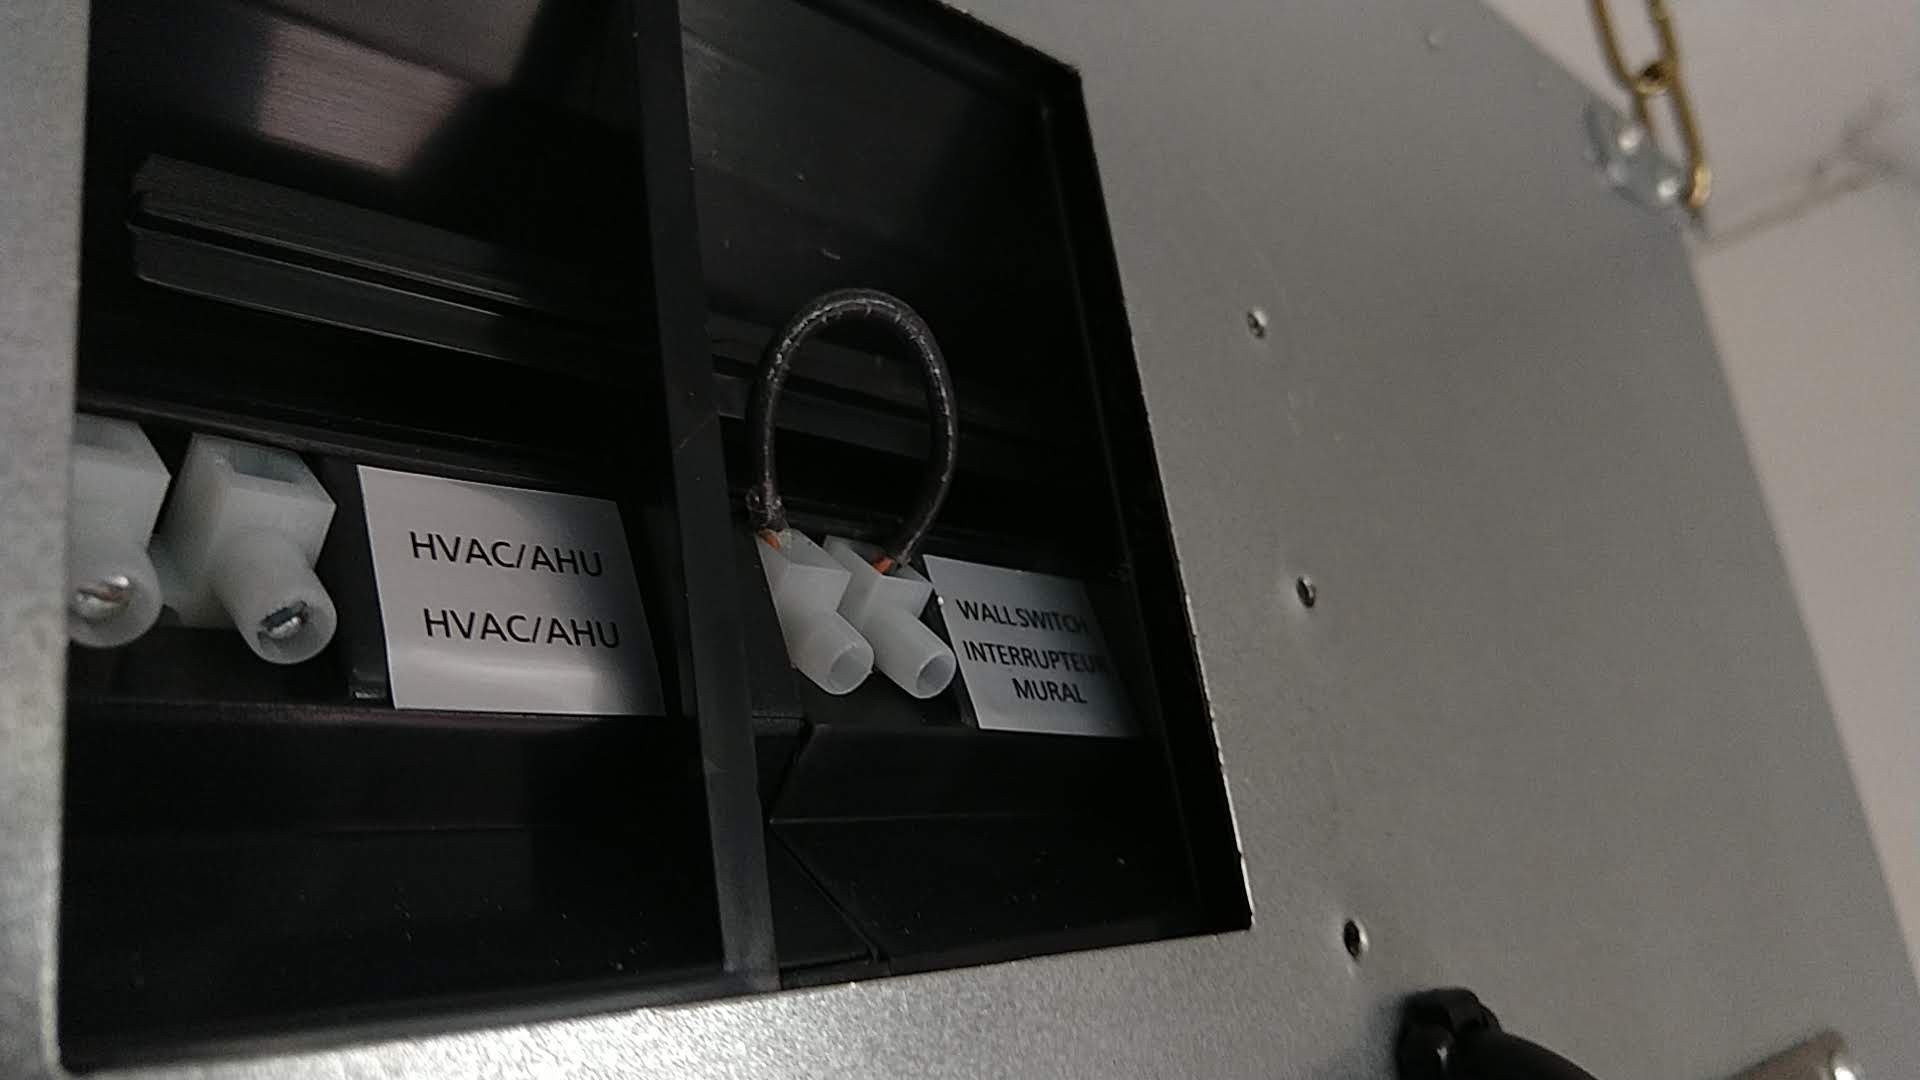
It turns out, however, that the FV-10VE WILL NOT RUN unless a wall switch circuit is installed and turned on. For a quick solution, I popped the wiring panel off the back of the unit, cut a small relay splice from some 12-gauge wire, and tied together the power receptacles for the switch (shown). The fix worked, and the unit started immediately when I hit the main rocker switch again. I’m sure I’ll hear from Panasonic if there’s some reason (code requirements or otherwise) that this solution should not be used.
Instant Results
Prior to starting up the ERV, I took some readings with an Awair indoor air monitor in one bedroom. Overall, air quality was very bad, a combination of excessive dust particulates, high humidity, and frequent spikes in CO2. After running the FV-10VE1 for about three hours, I took another reading. I also looked at the historic trends from the Awair record. After installing the ERV, I found the most dramatic improvement in the room's CO2 level. Checking it again the next day, the added ventilation had reduced nighttime CO2 levels to 50% of the previous average, as shown in the Before-After image. The particulate level, however seemed suspiciously unchanged however, so I brought in a second opinion—a Foobot air sensor.
The Foobot's results showed a marked improvement across the board in all types of pollutants in the same bedroom. I suspected that the stubborn dust readings on the Awair sensor might be inaccurate. After some research, I learned that the Awair sensors sometimes give false particulate readings as they become clogged. When I cleaned the Awair with pressurized air, its much improved results matched those of the Foobot fairly well.
Three Problems Solved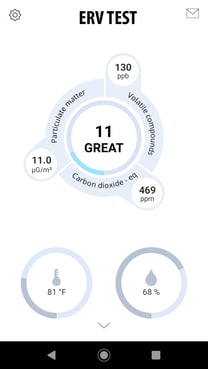
The ERV also solved other IAQ issues in this older home. The first was the lack of a ventilating bath fan—a problem typical of many older homes built in the 1970s and earlier. The second was the inadequate CFM of the kitchen range. With return ducts in both the bath and the cooking area of the kitchen, the FV-10VE1 clears humidity and overflow cooking particles automatically. In the bedrooms, the air is beyond better—it’s astronomically improved, never exceeding safe levels of CO2, chemicals, dust or VOCs.
As you can see from the Foobot screen shown, the Panasonic unit brought all levels of unhealthy pollutants down into safe and comfortable levels.
I haven’t spent a lot of time on the ERV unit’s specs, but you can read them here if you want the details. I feel comfortable recommending this unit as a quiet, energy efficient way to solve numerous indoor air problems simultaneously.
By Matt Power, Editor-In-Chief
Veteran journalist Matt Power has reported on innovation and sustainability in housing for nearly three decades. An award-winning writer, editor, and filmmaker, he has a long history of asking hard questions and adding depth and context as he unfolds complex issues.Also Read